There is a moment, about ten minutes into making a pumpkin roll cake, when you understand why this dessert has survived every food trend since the 1970s. You unroll a warm, spice-scented sponge, spread it thick with tangy cream cheese filling, roll it back up, and slice it to reveal that perfect spiral — burnt-orange cake ribboned with ivory cream, dusted with powdered sugar like the first snow. It looks like a patisserie showpiece. It tastes like Thanksgiving itself. And it is far easier than its reputation suggests.
The pumpkin roll’s fearsome reputation comes from one thing: cracking. Generations of bakers have unrolled their cakes to find a fault line down the middle. This guide eliminates that fear with the techniques professionals actually use — the towel roll, the timing, the exact sponge formula — plus five filling variations, a full troubleshooting clinic, make-ahead strategy, and serving ideas. By the end, you will wonder why you ever bought one from the bakery. If you are building the whole holiday dessert lineup, our best Thanksgiving desserts of 2026 shows where the roll fits among pies, bars, and tortes.
What Makes a Pumpkin Roll Work: The Science
A cake roll is an engineering problem disguised as dessert. The sponge must be thin enough to roll (about 1/2 inch), flexible enough to bend without breaking, and sturdy enough to hold a filling. Pumpkin is the ideal base for this because its puree adds moisture and natural sugars that keep the crumb pliable — a plain vanilla sponge dries out and cracks far more readily.
The Three Anti-Crack Pillars
Pillar one: the right flour ratio. Cake flour (or all-purpose with cornstarch) keeps gluten development low, which keeps the crumb tender and bendable. Over-mixed, high-gluten batter makes a sponge that springs back and splits. Pillar two: rolling while warm. A warm sponge is plastic and cooperative; a cool sponge has set its structure and resists bending. You roll the cake in a towel within minutes of it leaving the oven, let it cool in that rolled shape, and it “learns” the curve. Pillar three: moisture management. The towel absorbs surface steam so the cake does not get gummy, while the powdered sugar dusted on the towel prevents sticking. Master these three and cracking becomes a non-issue.
Ingredients
For the Pumpkin Sponge
- 3/4 cup (95g) all-purpose flour
- 1/2 teaspoon baking powder
- 1/2 teaspoon baking soda
- 1/2 teaspoon ground cinnamon
- 1/2 teaspoon ground cloves
- 1/4 teaspoon ground nutmeg
- 1/4 teaspoon fine salt
- 3 large eggs, room temperature
- 1 cup (200g) granulated sugar
- 2/3 cup (160g) pumpkin puree (not pumpkin pie filling)
- 1 teaspoon vanilla extract
- Powdered sugar, for dusting the towel (about 1/4 cup)
For the Classic Cream Cheese Filling
- 8 oz (225g) cream cheese, softened to room temperature
- 1 cup (120g) powdered sugar, sifted
- 6 tablespoons (85g) unsalted butter, softened
- 1 teaspoon vanilla extract
- Pinch of salt
Ingredient Notes
Pumpkin puree: Canned puree (Libby’s-style) is actually more consistent than homemade — it is made from a specific squash variety bred for low moisture. If you use homemade puree, strain it through cheesecloth for an hour first; excess water makes a gummy sponge. Room-temperature eggs and dairy: Cold eggs do not whip to full volume, and cold cream cheese makes lumpy filling. Set everything out 1 hour before baking. Spices: Freshly ground nutmeg and recently purchased cinnamon make a noticeable difference in a recipe where spice is the headline flavor; ground spices lose potency after about a year.
Equipment You Will Need
- 15×10-inch jelly roll pan (this exact size matters — a different pan changes the sponge thickness)
- Parchment paper
- One clean, thin cotton kitchen towel — not terry cloth (lint and texture transfer to the cake); a flour-sack towel is ideal
- Stand mixer or hand mixer
- Fine-mesh sieve for dusting
- Offset spatula for spreading filling
The Master Method, Step by Step
Step 1: Prepare the Pan and Towel (10 minutes)
Preheat the oven to 375°F (190°C). Line the jelly roll pan with parchment, leaving a 1-inch overhang on the short ends for lifting, and grease the parchment lightly. Lay the kitchen towel flat on the counter and dust it generously and evenly with powdered sugar through the sieve — every inch, edge to edge. This sugared towel is your rolling surface; skimping on the sugar is the top cause of sticking.
Step 2: Mix the Dry Ingredients (2 minutes)
Whisk the flour, baking powder, baking soda, cinnamon, cloves, nutmeg, and salt in a medium bowl. Whisking aerates and distributes the leaveners — with a thin sponge, uneven leavening shows as lumps and tunnels.
Step 3: Whip Eggs and Sugar (5 minutes)
Beat the eggs and granulated sugar on high speed for 3–5 minutes until thick, pale, and ribbony — when you lift the beaters, the batter should fall in a thick ribbon that holds its shape for a few seconds. This aeration is the sponge’s primary lift; under-whipped eggs make a dense, crack-prone cake. Then beat in the pumpkin puree and vanilla on low just until combined.
Step 4: Fold in the Dry Ingredients (2 minutes)
Sprinkle the dry mixture over the batter and fold gently with a spatula, scraping the bottom, just until no flour streaks remain. Stop the moment it is homogeneous — every extra stroke develops gluten and toughens the crumb. A few tiny lumps are fine; over-mixing is not.
Step 5: Bake (13–15 minutes)
Pour the batter into the prepared pan and spread it evenly to the corners with the offset spatula — thin spots overbake and crack. Bake 13–15 minutes until the top springs back when lightly touched and a toothpick comes out clean. Do not overbake: even 2 extra minutes dries the sponge past the point of flexible rolling. Start checking at 12 minutes.
Step 6: The Hot Roll (do this immediately)
Working quickly — within 1–2 minutes of the pan leaving the oven — run a knife around the edges, then invert the hot cake onto the sugared towel. Peel off the parchment. Starting from a short end, roll the cake up in the towel, rolling the towel inside the spiral. Set the rolled bundle seam-side down on a wire rack and cool completely, about 1 hour. The cake cools in its rolled shape, memorizing the curve. Do not skip this: a cake cooled flat will crack when you try to roll it later.
Step 7: Make the Filling (5 minutes)
Beat the cream cheese and butter until completely smooth — no lumps. Add the sifted powdered sugar, vanilla, and salt; beat until fluffy. The filling should be thick enough to hold its shape but spreadable. If it is too soft (warm kitchen), chill 15 minutes before spreading.
Step 8: Fill and Re-Roll (10 minutes)
Carefully unroll the cooled cake — it will want to stay curled, which is exactly right. Spread the filling evenly over the surface, leaving a 1/2-inch border on all sides (the filling squeezes outward as you roll). Re-roll the cake without the towel this time, using the towel only to help lift the first turn. Wrap the finished roll tightly in plastic wrap, twisting the ends like a sausage to compress it gently.
Step 9: Chill and Slice (at least 2 hours)
Refrigerate the wrapped roll at least 2 hours, preferably overnight — chilling firms the filling so slices hold their spiral. To serve, unwrap, dust the top generously with powdered sugar through the sieve, and slice with a long serrated knife using gentle sawing motions, wiping the blade between cuts. Trim the uneven end pieces (the baker’s reward) for a clean presentation.
Troubleshooting Clinic: Every Crack, Tear, and Soggy Bottom Solved
“My cake cracked when I unrolled it”
The most common complaint, with three usual causes. Overbaking is number one — even slightly dry sponge cracks. Pull the cake the moment it springs back. Cooling flat is number two — the hot towel roll is mandatory, not optional. Under-whipped eggs is number three — a dense crumb has no flex. Minor surface cracks are cosmetic: they disappear under powdered sugar and filling, so do not despair over hairlines. Deep cracks usually mean the cake cooled before rolling — next time, roll within 2 minutes of the oven.
“The cake stuck to the towel”
You under-sugared the towel, used a terry towel, or waited too long to roll. Dust heavily — you should barely see towel through the sugar — and roll while the cake is steaming hot. If it sticks anyway, do not yank; dampen the towel’s back lightly and peel slowly. Next time, consider rolling on parchment dusted with powdered sugar instead of a towel — many bakers find it foolproof.
“My filling oozed out everywhere”
Too much filling, filling too warm, or no border left at the edges. Use the full recipe amount (it looks like a lot; it is correct), leave the 1/2-inch border, and chill soft filling before spreading. Rolling snugly — not loosely — also keeps the spiral tight so filling stays put.
“The roll is soggy / gummy”
Wet pumpkin puree (strain homemade puree), underbaked sponge (it steams itself gummy as it cools), or wrapping the hot roll in plastic instead of a breathable towel. The towel step exists partly to wick surface moisture — plastic traps it.
“The spiral looks loose and sloppy”
The initial hot roll was too loose. Roll the towel bundle snugly — firm pressure, no gaps — and twist the plastic wrap ends firmly on the final wrap to compress. An overnight chill also tightens everything as the filling sets.
“The cake tastes eggy”
Under-mixed batter or too-hot oven setting the exterior before the interior baked through. Make sure the eggs are fully whipped into the sugar (pale and ribbony) and verify your oven temperature — an oven running 25°F hot is a common culprit.
Five Filling Variations
1. Maple Cream Cheese
Replace the vanilla with 2 tablespoons pure maple syrup and reduce the powdered sugar to 3/4 cup. The maple deepens the autumn flavor and pairs beautifully with the pumpkin spice. A pinch of extra cinnamon in the filling ties it together.
2. Chocolate Ganache + Cream Cheese Swirl
Spread a thin layer of cooled chocolate ganache (4 oz chocolate melted with 1/4 cup cream) over the sponge first, then the cream cheese filling over it. The slice shows three bands — pumpkin, chocolate, cream — and tastes like a chocolate-pumpkin truffle in cake form. For the full chocolate treatment, see our chocolate pecan pie.
3. Brown Butter Cream Cheese
Brown the butter first — melt it in a light-colored pan until it foams, smells nutty, and turns amber with brown specks — then cool to soft-solid before beating with the cream cheese. Brown butter adds toffee depth that makes the classic filling taste like an upgrade. This is the variation that gets the most “what IS in this?” reactions.
4. Cranberry-Orange Cream Cheese
Fold 1/3 cup finely chopped sugared cranberries and 1 teaspoon orange zest into the classic filling. The tart cranberry pops against the sweet cream and spiced cake — and the ruby flecks in the spiral are gorgeous. Ideal if your dessert table needs something bright among all the brown-and-orange.
5. Dairy-Free / Vegan Filling
Use vegan cream cheese and vegan butter sticks (not tub spread) in the same ratios, plus a squeeze of lemon juice to mimic cream cheese tang. The sponge itself needs eggs, so for a fully vegan roll, replace each egg with 1/4 cup aquafaba whipped to soft peaks — the result is slightly denser but rolls well. Our vegan Thanksgiving menu has more plant-based holiday ideas.
Make-Ahead Strategy & Storage
The Ideal Timeline
The pumpkin roll is a dream make-ahead dessert — it requires chilling, so you are never fighting the clock. Up to 1 month ahead: Bake the sponge, roll it in the towel, cool, then wrap the towel-rolled bundle in plastic and freeze. Thaw overnight in the fridge, then fill and re-roll. 2–3 days ahead: Assemble the full roll, wrap tightly, and refrigerate — the flavor actually improves as the filling’s tang mellows into the spiced cake. Day of: Unwrap, dust with powdered sugar, slice, serve.
Storage Rules
Refrigerated, well-wrapped: 5 days. The sponge stays moist thanks to the pumpkin; the filling is the limiting factor. Frozen (fully assembled): wrap in plastic then foil, freeze up to 2 months, thaw overnight in the fridge. Do not dust with powdered sugar until serving — it melts into the surface during storage. Sliced leftovers keep 3 days refrigerated; the cut faces dry slightly, so press plastic directly against them.
Transporting to a Potluck
Transport the roll whole and unsliced, wrapped in plastic, in the jelly roll pan or a long container — it is far sturdier whole than sliced. Bring powdered sugar and a sieve to dust on arrival, plus your serrated knife. Our Thanksgiving potluck guide covers coordinating with other contributors so your roll arrives as the dessert hero, not the third pumpkin thing.
Serving & Presentation Ideas
The Classic Slice
Thick slices (about 1 inch) on dessert plates, extra dusting of powdered sugar, a few sugared cranberries alongside. Simple, and the spiral does all the visual work. Serve slightly chilled or at cool room temperature — never warm, or the filling softens.
The Dressed-Up Plate
Smear a swoosh of caramel sauce on the plate, set the slice on it, add a quenelle of whipped cream and a sprinkle of toasted pecans. Restaurant plating takes 30 seconds per plate and transforms the humble roll into a dinner-party dessert.
The Dessert Table Showpiece
Present the roll whole on a long platter, dusted dramatically with powdered sugar and surrounded by sugared cranberries, cinnamon sticks, and small pumpkins. Slice to order — guests love watching the spiral revealed. For a full display plan, our Thanksgiving dessert table ideas guide covers heights, linens, and flow.
Pairing Drinks
The tangy cream cheese filling loves contrast: hot black coffee, a pumpkin spice old fashioned, or a glass of mulled apple cider. For the coffee purists, our Thanksgiving coffee drinks roundup has spiced options that echo the cake’s flavors.
Pumpkin Roll Around the Holidays: Beyond Thanksgiving
While this guide is written for Thanksgiving 2026 (November 26), the pumpkin roll is a multi-holiday workhorse. It fits Christmas dessert tables, Friendsgiving potlucks, and autumn bake sales equally well — the flavors read “fall” rather than “Thanksgiving-specific.” A few seasonal adaptations: for Christmas, add a thin layer of cranberry jam under the filling and dust with powdered sugar “snow”; for a Halloween party, tint half the filling orange and swirl it for a marbled spiral; for a spring event, swap pumpkin for lemon curd filling in a vanilla sponge using the same rolling technique. The towel-roll method itself is a transferable skill — once you can roll pumpkin, you can roll chocolate Yule logs, jelly rolls, and savory roulades with the same confidence.
Scaling for a Crowd
One roll serves 10–12 as part of a dessert spread. For 20+ guests, bake two rolls rather than doubling into a bigger pan — the sponge thickness is calibrated to the 15×10 pan, and a thicker sponge cracks. Two rolls also let you offer two fillings (classic + chocolate swirl), which looks generous and doubles your flavor range. If oven space is tight on the day, bake the sponges Tuesday, freeze in their towel rolls, and fill Wednesday — our make-ahead guide slots this neatly into a full holiday prep plan.
In Pictures: Pumpkin Roll Cake
The spiral is the whole point of a pumpkin roll. This shot shows the swirl of spiced sponge and cream cheese filling up close.
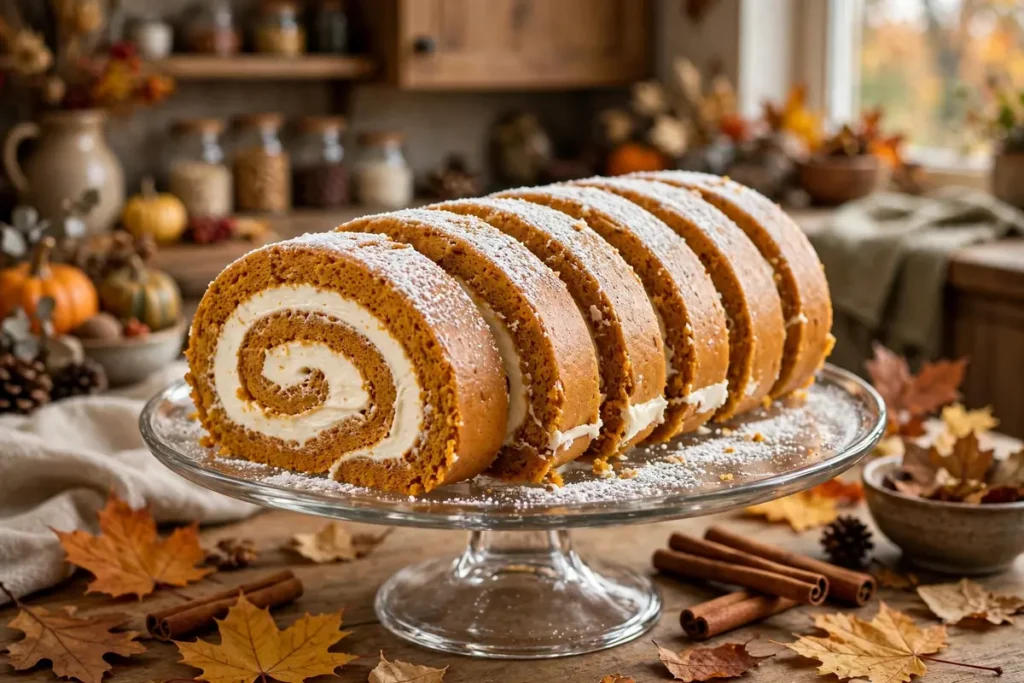
Slices of pumpkin roll cake on a glass stand, revealing the spiral of spiced pumpkin sponge and cream cheese filling.
Watch: Pumpkin Roll Cake
Wyse Guide bakes a pumpkin roll with his Grandma Alice — a lovely walkthrough of rolling the sponge without cracks.
At a Glance: Pumpkin Roll Cake
Timing, technique and storage notes for a pumpkin roll that slices cleanly every time.
| Detail | What to know |
|---|---|
| Bake time | The thin sponge bakes in roughly 12–15 minutes |
| Rolling trick | Roll the warm sponge in a sugared towel to prevent cracking |
| Filling | Chill the cream cheese filling before spreading for the neatest swirl |
| Chilling | Refrigerate at least 1 hour before slicing |
| Servings | One roll typically yields 8–10 slices |
| Storage | Keeps about 3–4 days refrigerated, well wrapped |
Frequently Asked Questions
Can I make a pumpkin roll without a jelly roll pan?
You need a rimmed pan close to 15×10 inches — a 13×9 pan makes a thicker sponge that is harder to roll (reduce filling slightly and watch the bake time, adding 2–3 minutes). A half-sheet pan (18×13) makes too thin a sponge; scale the recipe up by 1.5x. The 15×10 jelly roll pan is inexpensive and worth owning if you bake rolls more than once.
Why did my pumpkin roll crack?
Overbaking is the top cause, followed by cooling the cake flat instead of in the hot towel roll, and under-whipped eggs making a dense crumb. Roll within 2 minutes of the oven, pull the cake the moment it springs back to the touch, and whip eggs and sugar to the full ribbon stage. Small surface cracks hide under powdered sugar — only deep splits are a real problem.
Can I freeze a pumpkin roll?
Yes — it freezes excellently. Wrap the finished roll tightly in plastic wrap, then foil, and freeze up to 2 months. You can also freeze the unfilled sponge in its towel roll. Thaw overnight in the refrigerator, then dust with powdered sugar and slice. Do not freeze with the powdered sugar dusting on — it dissolves during thawing.
How long does pumpkin roll last in the fridge?
5 days, tightly wrapped in plastic. The cream cheese filling sets the limit; the sponge itself stays moist longer thanks to the pumpkin. For food-safety peace of mind with all your holiday dishes, see our Thanksgiving food safety tips.
Can I make pumpkin roll gluten-free?
Yes. Replace the all-purpose flour with a 1:1 gluten-free blend (one containing xanthan gum) at the same weight. The sponge is naturally low-structure, so it adapts better than most cakes — just avoid over-mixing and roll promptly. Our gluten-free Thanksgiving desserts guide covers flour choices and technique in depth.
What is the difference between pumpkin puree and pumpkin pie filling?
Pumpkin puree is 100% cooked pumpkin — that is what this recipe needs. Pumpkin pie filling is puree pre-mixed with sugar, spices, and sometimes thickeners; using it would double the sugar and spice and throw off the chemistry. Always check the can label: you want the one that lists only pumpkin as the ingredient.
Conclusion
The pumpkin roll cake looks like a magic trick and bakes like a weeknight cake — that gap between appearance and effort is exactly why it belongs on your Thanksgiving table. Whip the eggs well, roll it hot in a sugared towel, chill it overnight, and slice it with confidence. The spiral will be there, the cream will be tangy, and someone will ask you to bring it every year from now on.
With dessert handled days ahead, give the rest of the holiday the same calm treatment: our Thanksgiving Day cooking schedule and turkey guide keep the savory side on track, and the full dinner timeline ties everything together. Happy baking — and happy Thanksgiving 2026.