Guitar Chords for Beginners: Your First 10 Chords and How to Play Them
Every guitarist you admire — from campfire strummers to stadium headliners — started exactly where you are: staring at six strings, wondering how anyone’s fingers bend that way. The beautiful secret is that a handful of simple chords unlocks thousands of songs. Learn ten shapes, practice changing between them smoothly, and within weeks you will be playing real music that people recognize. Not exercises. Songs.
This guide teaches the ten essential beginner chords with clear finger-placement descriptions, how to read chord diagrams, the strumming basics that make chords sound musical, a practice routine that builds calluses without misery, the five easy songs to learn first, and how to fix the buzzing and muting problems every beginner hits. Grab your guitar — by the end of this article you will know exactly what to practice tonight.
A note on the instrument: any playable guitar works — acoustic or electric. What matters is that it is set up decently (strings not a mile off the fretboard) and stays in tune. A $150 guitar with a proper setup beats a $600 guitar with terrible action. If your fingers hurt excessively after a week, see a guitar shop about lowering the action; it is a $40 fix that changes everything.
How to Read Chord Diagrams
Before the chords themselves, learn the map. A chord diagram is a tiny picture of the fretboard: vertical lines are the six strings (low E on the left, high E on the right), horizontal lines are the frets, and numbered dots show where your fingers go — 1 for index, 2 for middle, 3 for ring, 4 for pinky. An “O” above a string means play it open (no finger); an “X” means do not play it at all.
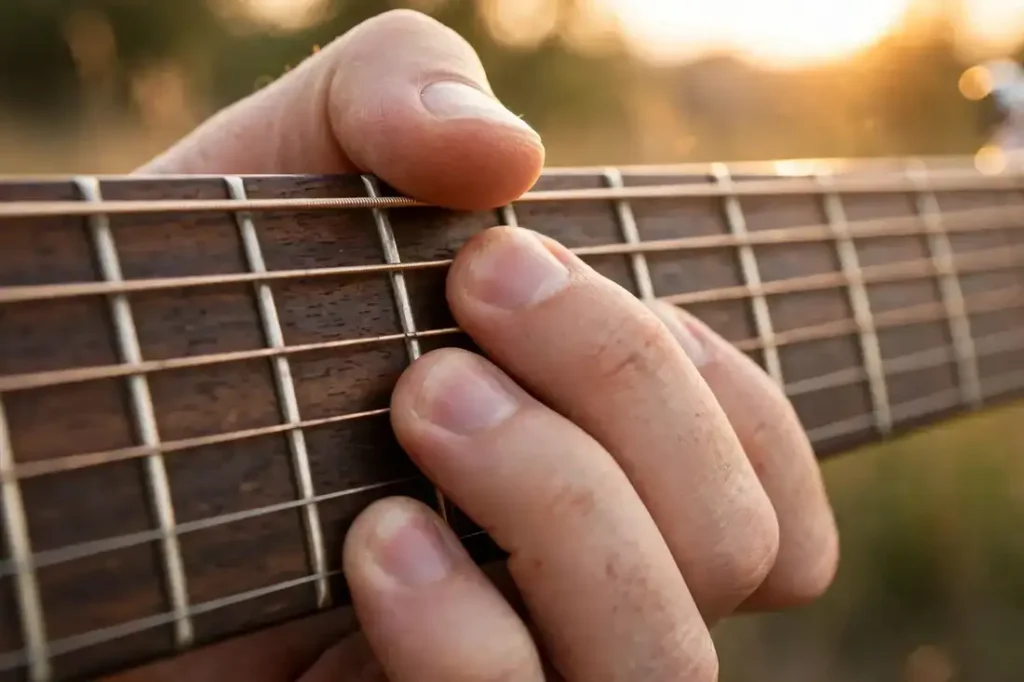
Finger numbering trips up every beginner once: your index is 1, not your thumb. The thumb stays behind the neck for support (classical position) or drapes over the top (folk/blues position) — both are valid, and you will use both. Keep your fretting fingers curled, pressing with the fingertips just behind the fret wire — not on top of it, not in the middle of the fret. That one detail eliminates half of all beginner buzzing.
Your First 5 Chords: The Big Wins
Learn these five first. They are the most-used chords in popular music, they share finger shapes that make switching easier, and together they play hundreds of songs.
G Major
Fingers: middle (2) on the 5th string 2nd fret, index (1) on the 5th string… let us do it properly: the classic open G uses middle finger on the low E string 3rd fret, index on the A string 2nd fret, and ring on the high E string 3rd fret — all six strings ring. It is a big, happy sound and the anchor of countless songs. The stretch feels wide at first; it loosens within days.
C Major
Ring finger (3) on the A string 3rd fret, middle (2) on the D string 2nd fret, index (1) on the B string 1st fret. Do not play the low E string (X). C major is the “home base” chord of western music — warm, resolved, everywhere. The 1st-fret index stretch is the main challenge; keep the thumb low on the neck for reach.
D Major
Index (1) on the G string 2nd fret, ring (3) on the B string 3rd fret, middle (2) on the high E string 2nd fret — a tight triangle on the top three strings. Do not play the low E and A strings. D major rings bright and cheerful. The cramped triangle is awkward for big fingers; angle your hand so fingers come down vertically on the fingertips.
E Minor
The easiest full chord in existence: middle (2) on the A string 2nd fret, ring (3) on the D string 2nd fret, all six strings ring. Two fingers, huge moody sound. E minor is your reward chord — learn it in sixty seconds and feel like a guitarist immediately.
A Minor
Middle (2) on the D string 2nd fret, ring (3) on the G string 2nd fret, index (1) on the B string 1st fret. Skip the low E string. A minor is E minor’s melancholy sibling — the sound of a thousand ballads. Notice how it shares a shape-family with E major and C major; chord shapes recycle, which is why learning compounds.
The Next 5: Completing Your Toolkit
- E Major — like E minor plus index (1) on the G string 1st fret; the bright counterpart to Em’s moodiness.
- A Major — index, middle, ring squeezed onto the D, G, B strings at the 2nd fret; cramped but essential.
- D Minor — the sad, beautiful one: index on high E 1st fret, middle on G 2nd fret, ring on B 3rd fret.
- G7 (dominant seventh) — adds bluesy tension; index on high E 1st fret added to your G shape family.
- Cadd9 — the “Wonderwall” chord: like G with fingers shifted; an instant upgrade to your G–C–D progressions.
With these ten, you can play the chord progressions behind an enormous fraction of popular music. The I–V–vi–IV progression (C–G–Am–F, or G–D–Em–C) alone underpins hundreds of hits — which is why beginners who learn these shapes feel like they unlocked a cheat code. They did.
Chord Changing: The Real Skill
Knowing chord shapes is 20% of the battle; switching between them in rhythm is the other 80%. Here is how to get fast without developing bad habits.
- Practice changes, not chords. Drill pairs (G to C, C to D, Em to Am) as the unit of practice — set a metronome slow and change on the beat.
- Find pivot fingers. Fingers that stay put (or barely move) between two chords are anchors — keep them down and move the others around them.
- Hover, don’t leap. Lift fingers just off the strings and glide to the next shape; big lifts waste motion and time.
- One-minute changes. The classic exercise: pick two chords, count clean changes in 60 seconds. Track your score; 30+ is solid beginner speed, 60+ is flying.
- Slow is smooth, smooth is fast. Practice at half speed with perfect clarity; speed arrives on its own. Rushing builds slop that takes months to unlearn.
- Strum through the fumbles. Keep your strumming hand moving even when the fretting hand is late — rhythm continuity matters more than perfect chords.
Strumming Basics: Making Chords Musical
Chords without rhythm are just shapes. Start with the universal beginner pattern: down, down-up, up-down-up (counted “1, 2-and, and-4-and”). Keep your wrist loose — strumming comes from the wrist, not the elbow — and brush the strings rather than attacking them. A thin pick (.60–.73mm) forgives heavy hands; hold it loosely between thumb and index, letting it flex.
Dynamics matter as much as patterns: accent the first beat, ease off on the rest, and suddenly your G–C–D sounds like music instead of an exercise. Mute strings with your fretting hand for percussive “chick” effects between strums — the rhythmic spice of folk, pop, and funk. Record yourself on your phone weekly; the playback reveals progress your hands cannot feel yet.
| Chord | Difficulty | Songs It Unlocks | Watch For |
|---|---|---|---|
| E minor | ★☆☆☆☆ | Hundreds of rock/folk songs | Almost nothing — the freebie |
| G major | ★★☆☆☆ | Country, pop, worship music | The wide 3-fret stretch |
| C major | ★★☆☆☆ | Pop, folk, children’s songs | Muted high E string |
| D major | ★★★☆☆ | Folk-rock, bluegrass | Cramped triangle; buzzing |
| A minor | ★★☆☆☆ | Ballads, pop, rock | Accidentally muting the B string |
| F major (easy) | ★★★★☆ | Everything (the full barre comes later) | Use the XX3211 cheat version first |
Fixing Buzz and Muted Strings
Every beginner fights buzzing. The causes are almost always the same short list — run through it like a pilot’s checklist.
- Press just behind the fret — too far back and the string rattles; right behind the wire is the sweet spot.
- Use fingertip, not pad — flat fingers mute neighboring strings; curled fingertips clear them.
- Press firmly enough — beginners press too lightly from politeness; the string needs confident pressure.
- Check thumb position — thumb anchored mid-neck gives fingers leverage; a wrapped thumb weakens the stretch.
- Trim fretting-hand nails — long nails force flat fingers; this alone fixes many beginners’ buzz.
- Rule out the guitar — if buzz persists with good technique on one fret, the setup may need attention; a shop fixes it cheaply.
Your First 5 Songs
Learn songs immediately — they are the reason for the chords, and motivation is fuel. These five use only the chords above and are beloved for good reason.
- “Horse With No Name” (America) — two chords (Em and a D6 variant) for the entire song; the ultimate first song.
- “Knockin’ on Heaven’s Door” (Dylan/GnR) — G–D–Am–C; four chords, infinite singalong.
- “Love Me Do” (Beatles) — G–C–D with a simple strum; pure joy.
- “Riptide” (Vance Joy) — Am–G–C; the modern campfire standard.
- “Three Little Birds” (Marley) — A–D–E; impossible to play without smiling.
Playing for others accelerates everything — the gentle pressure of an audience (even one patient friend) sharpens timing like nothing else. The same social magic that makes best Black Friday guitar deals season exciting applies: gear talk and song swaps are the community glue of guitar culture.
The 20-Minute Daily Practice Routine
- Minutes 0–3: Warm up. Chromatic finger exercises up and down the neck; stretch gently.
- Minutes 3–8: One-minute changes. Two chord pairs, 60 seconds each, counting clean switches.
- Minutes 8–15: Song work. Play through your current song; loop the hardest change 10 times.
- Minutes 15–18: New chord or technique. One new shape or strumming pattern, slowly.
- Minutes 18–20: Play for fun. End every session playing something you enjoy — this is what brings you back tomorrow.
Consistency beats duration absolutely: 20 minutes daily outperforms 3 hours on Sunday. Your fingertips will hurt for the first 1–2 weeks — that is calluses forming, and it passes. Do not play through sharp pain (tendonitis is real; stretch and rest), but do play through the dull fingertip ache. Every guitarist has paid this toll; it is the cheapest admission in music.
Barre Chords: Conquering the Dreaded F
Every beginner hits the barre-chord wall — usually at F major. One finger must press all six strings while others form a shape, and it feels physically impossible for weeks. Then one day it rings clean, and a thousand songs open up. Here’s how to get there faster.
Why Barres Matter
Barre chords are movable shapes — learn one F barre and you can play every major chord by sliding it up the neck (F at fret 1, G at fret 3, A at fret 5…). They’re the gateway to the entire fretboard: the same E-shape barre gives you twelve major chords, the A-shape gives twelve more, and minor versions double it again. Open chords gave you songs; barres give you the neck.
The Technique, Step by Step
- Start at higher frets — practice the F shape at fret 5 or 7 first, where frets are closer and tension is lower; slide down as strength builds.
- Roll the index finger slightly — use the bony side edge rather than the fleshy pad; bone presses strings more effectively.
- Position near the fret — the barre finger sits just behind the fret wire, like all fretting; distance causes buzz.
- Use arm weight, not grip force — pull the neck gently toward you with your fretting arm; squeezing with the thumb exhausts you.
- Thumb placement — mid-neck, roughly behind the barre finger; it anchors the pressure.
- Arch the other fingers — they form the E or A shape ahead of the barre; keep them curled and vertical.
- Build gradually — 5 minutes of barre practice daily beats one painful 30-minute session; tendons strengthen slowly.
- Check each string — pluck strings individually to find the buzzer; usually the B or high-E under a finger joint — adjust the roll.
The Essential Movable Shapes
| Shape | Root String | Example | Use |
|---|---|---|---|
| E-shape major barre | Low E | F at fret 1 | The foundation; learn first |
| E-shape minor barre | Low E | Fm at fret 1 | Lift the middle finger from major |
| A-shape major barre | A string | Bb at fret 1 | Second shape; trickier ring-finger barre |
| A-shape minor barre | A string | Bbm at fret 1 | Common in rock and pop |
Troubleshooting Barre Pain
- Dull fingertip ache — normal; it’s building the barre callus. Persist.
- Sharp wrist pain — stop; check wrist angle (keep it relatively straight) and reduce grip force.
- Thumb cramping — you’re squeezing; shift effort to arm weight and reposition the thumb.
- It takes weeks — 3–6 weeks of daily practice is normal; the overnight breakthrough is real but it comes after the grind.
Fingerpicking Basics: Beyond the Strum
Strumming is half the guitar; fingerpicking is the other half — and it opens folk, classical, and Travis-picking worlds that flatpicks can’t reach.
The Fundamentals
- Assign fingers — thumb (p) handles bass strings (E, A, D); index (i), middle (m), ring (a) take G, B, high-E. This classical assignment is the foundation.
- Start with the pattern — the universal beginner pattern: thumb-index-middle-ring on a held chord, repeating. Get it smooth before adding complexity.
- Travis picking — the alternating thumb bass (root-fifth-root-fifth) with melody on top; the sound of folk and country guitar. Learn it on a simple C–G progression.
- Keep nails (or don’t) — flesh gives warmth, nails give clarity; classical players shape nails carefully, folk players often use flesh.
- Anchor or float — resting the pinky on the pickguard stabilizes beginners; advanced players float freely. Start anchored.
- Slow and even — fingerpicking exposes unevenness mercilessly; practice with a metronome at half speed.
First Fingerpicking Songs
- “Dust in the Wind” (Kansas) — the classic Travis-picking etude; learnable in sections.
- “Landslide” (Fleetwood Mac) — beautiful, repetitive, forgiving; the fingerpicker’s “Horse With No Name.”
- “Blackbird” (Beatles) — independence-building classic; start painfully slow.
- “Hallelujah” (various) — simple pattern, emotional payoff; great for practicing dynamics.
Fingerpicking pairs beautifully with the theory in our music theory basics guide — understanding which notes belong to each chord lets you build your own picking patterns instead of memorizing others’. The fingers learn the shapes; the theory teaches them where to go.
Tuning, Capos, and the Accessories That Matter
Chords are the vocabulary; these are the tools that keep you speaking clearly. Beginners underestimate accessories — the right ones remove friction that silently kills practice.
Tuning: The Non-Negotiable Habit
- Tune every time you play — no exceptions; practicing on an out-of-tune guitar trains your ear wrong.
- Clip-on tuners — $10–$15, accurate, work in noisy rooms; the single best accessory purchase.
- Tune up to pitch — always approach the note from below; tuning down leaves slack that drifts.
- Stretch new strings — gently pull new strings away from the fretboard repeatedly; they’ll hold tune 10x faster.
- Learn to tune by ear eventually — the 5th-fret method; tuners are tools, ears are musicianship.
- Check intonation — if chords sound right open but wrong up the neck, the guitar needs setup, not your ears.
Capos: Instant Key Changes
- What it does — clamps across the neck, raising pitch; play G-shape chords at capo 2 and you’re in A.
- Why beginners love them — play in any key using easy open shapes; singers find their range without barre chords.
- Placement — just behind the fret, centered, firm but not crushing; poor placement causes tuning issues.
- Types — spring clamp (fast, strong), screw-adjust (precise tension), elastic (cheap, uneven); spring is the standard.
- Creative uses — partial capos (covering 3–5 strings) create alternate tunings instantly; advanced color for later.
- Retune after placing — capos pull strings sharp; a quick tuning check keeps everything honest.
Picks, Straps, and the Rest
- Picks: start thin — 0.60–0.73mm for strumming beginners; thicker as technique develops. Buy a variety pack and experiment.
- Strap — even sitting players benefit; consistent guitar position builds consistent technique. Padded 2″+ straps for comfort.
- Humidifier — acoustic guitars crack in dry winters; a $15 soundhole humidifier prevents thousand-dollar repairs.
- String winder/cutter — string changes take 10 minutes with one, 30 without; the tool pays for itself immediately.
- Metronome app — free, essential; timing is the skill that separates players from strummers.
- Gig bag or case — protect the investment; humidified hard cases for nice acoustics.
- Music stand — proper posture for reading; hunching over a table builds bad habits.
Accessory wisdom mirrors the music theory basics philosophy: small fundamentals, compounded. None of these is exciting; all of them remove the tiny frictions — the drifting tuning, the sore shoulder, the cracked top — that end guitar journeys prematurely.
10 Practice Pro Tips
How you practice matters more than how long. These principles accelerate every beginner.
- Practice daily, even 10 minutes — consistency builds neural pathways; the 10-minute daily session beats the 2-hour weekly one for motor learning. Never miss twice.
- Use a metronome from week one — timing is the skill that separates players from strummers; free apps work fine. Start painfully slow.
- Record yourself weekly — phone recordings reveal progress invisible day-to-day and expose timing issues you’d never feel. The monthly comparison is pure motivation.
- Learn songs, not just exercises — exercises build technique, songs build musicians; the 80/20 split favors songs. Every technique should serve a song.
- Isolate the hard two seconds — loop the chord change that fails, not the whole song; 50 repetitions of the problem spot beats 5 full playthroughs.
- Practice standing up — if you’ll ever perform, practice standing; the guitar sits differently and your muscle memory should match reality.
- End every session with fun — play something you love for the last 5 minutes; the positive ending is what brings you back tomorrow.
- Learn the fretboard gradually — one string’s notes per week; the fretboard unlocks slowly and then all at once.
- Play with others ASAP — the timing pressure of playing with humans accelerates learning like nothing else; find a jam, tolerate the nerves.
- Rest injured hands — sharp pain means stop; tendonitis ends guitar journeys. Stretch, rest, and return. The guitar will wait.
Frequently Asked Questions
How long does it take to learn guitar chords?
Your first 3–4 open chords: 1–2 weeks of daily practice. Smooth changes between 8–10 chords: 1–3 months. “Play songs comfortably around a campfire” level: 3–6 months for most consistent beginners. Barre chords (the next frontier): typically months 4–8. Everyone’s timeline varies, but daily short practice beats all other variables.
Should a beginner start on acoustic or electric?
Either works. Acoustic is simpler (no amp needed) and builds finger strength fast; electric is physically easier (lighter strings, lower action) and more forgiving. Choose based on the music you want to play — motivation beats ergonomics. If undecided, a playable acoustic is the classic start.
Why do my fingers hurt so much?
Steel (or nylon) strings vs. soft fingertips — the strings win at first. Dull fingertip soreness for 1–2 weeks is normal and resolves into calluses. Sharp wrist or forearm pain is not normal: check your posture, lower the guitar, relax your grip, and rest. If pain persists, see a teacher about technique before it becomes injury.
What is the hardest beginner chord?
F major, unanimously — the full barre version demands finger strength beginners lack. Use the easy cheat version (XX3211) for months without shame; nearly every guitarist did. B minor is the runner-up. Both yield to patient practice, and conquering F barre is a genuine rite of passage.
Do I need to learn music theory to play chords?
No — you can play thousands of songs with shapes alone. But a little theory (what makes a major chord major, how keys work) multiplies your understanding later. Our gardening for beginners guide makes the same point about foundations: learn by doing first, add theory when curiosity strikes. When it does, start with our music theory basics guide.
How often should I change guitar strings?
For beginners practicing daily: every 2–3 months, or when strings sound dull, feel grimy, or won’t stay in tune. Fresh strings are the cheapest tone upgrade in music (~$6–$12) and make playing noticeably more pleasant. Learn to change them yourself — it is a 15-minute skill every guitarist needs.
Watch and Learn: Your First 3 Chords
Seeing finger placement in motion beats any diagram. This quick lesson gets your first three chords under your fingers in minutes:
Your 7-Day Quick-Start Challenge
Reading is step zero; doing is the hobby. This one-week plan takes you from curious to committed in 20–30 minutes a day:
- Day 1: Tune up, learn E minor and G; practice switching between them for 10 minutes.
- Day 2: Add C major; drill the G–C change with the one-minute-changes exercise.
- Day 3: Add D major; practice the G–C–D progression slowly with a metronome.
- Day 4: Learn A minor and E major; play through all five chords in sequence.
- Day 5: Start ‘Horse With No Name’ — two chords, full song; play it start to finish.
- Day 6: Record yourself playing the progression; note buzzes and fix hand positions.
- Day 7: Play your song for someone; then pick your next song and keep the streak alive.

Play Your First Song Tonight
Here is your assignment: learn E minor, G, and D today — three shapes, one evening. Tomorrow, practice switching between them with the one-minute-changes drill. By the weekend, play “Horse With No Name” all the way through. It will be rough. It will also be the first song you ever played, and you will remember it forever.
The guitar rewards the stubborn and the joyful in equal measure. Keep sessions short, end with something fun, forgive the buzzing, and trust the process that has worked for millions of beginners before you. Ten chords stand between you and a lifetime of music. Start with one.