
15 Rangoli Designs for Diwali 2026 With Step-by-Step Pattern Guides
The rangoli is Diwali’s most democratic art form — no canvas, no frame, just colored powder, flower petals, and a doorway. Every Diwali morning, millions of doorsteps across India bloom with these ephemeral designs: geometric grids, peacock feathers, lotus blooms, and swirling paisleys that welcome Goddess Lakshmi and every guest who crosses the threshold. The best part? You do not need to be an artist. Rangoli is built on dot grids and simple repeated strokes, which means anyone can learn it with a little guidance.
This guide gives you 15 rangoli designs for Diwali 2026, ordered from absolute-beginner to showstopper, each with a genuine step-by-step pattern guide — dot counts, stroke order, color suggestions, and the mistakes to avoid. We cover powder rangoli, flower rangoli, and mixed-media designs, plus the materials you need, how to draw perfect dot grids, and how to make your rangoli last through all five days of Diwali. Pair your finished rangoli with lit diyas using our Diwali festival of lights guide for the full glowing effect.

Rangoli Basics: Materials You Need
Before your first dot, gather the right supplies. You need: colored rangoli powder (buy a multi-color set — red, yellow, white, green, blue, orange, pink, purple), white rangoli powder or rice flour for outlines and dot grids, a flat sieve or tea strainer for even powder flow, cotton wicks or cone bottles for fine lines, a piece of chalk for sketching the design first, and a damp cloth for fixing mistakes. For flower rangoli, buy loose marigold heads, rose petals, and jasmine in bulk. Optional but useful: rangoli stencils (brilliant for beginners), a small broom for prepping the surface, and diyas to place around the finished design.
Prep your surface by sweeping it clean and sprinkling a little water — a slightly damp floor grips powder far better than a dry, dusty one. If you are working on a smooth tile or marble floor, a very thin smear of oil or a light mist of water keeps the powder from sliding. Always sketch with chalk first; it wipes away easily and saves you from lopsided disasters.
The Dot-Grid Method: Rangoli’s Secret Weapon
Almost every traditional rangoli starts as a grid of dots. The dots are your skeleton — connect them in the right order and the design draws itself. Here is how to master it:
Step 1: Decide your grid size. Beginners: start with 5×5 or 7×7 dots. Intermediate: 9×9 or 11×11. Advanced kolam-style: 13×13 or 15×15. Step 2: Mark dots in straight rows with white powder or chalk, spacing them evenly — use your thumb and forefinger as a measuring guide (one “pinch-width” apart). Step 3: Draw your connecting lines. The classic technique: loop around each dot in a continuous curved line, never lifting your hand — this creates the flowing kolam look. Step 4: Fill the enclosed shapes with colored powder, working from the center outward. Step 5: Add white outlines last; they sharpen every edge and make colors pop.
Practice the dot grid on paper first — draw 20 grids on newspaper before you touch the floor. Your hand learns the spacing, and your Diwali-morning rangoli will be dramatically neater.
The 15 Designs: Step-by-Step Pattern Guides
1. Simple Diya Corner Rangoli (Beginner, 30 minutes)
The perfect first rangoli. Draw a large quarter-circle in the corner of your doorway with white powder. Inside it, draw three diya shapes — simple teardrop flames over small bowl shapes — spaced evenly along the arc. Fill each diya bowl with orange powder and each flame with yellow, then outline everything in white. Scatter red dots between the diyas and place one real lit diya at the center of the arc after dark. Why it works: three repeated shapes, zero freehand drawing, and it looks intentional and festive from the street.
2. Five-Dot Flower (Beginner, 20 minutes)
Mark five dots in a cross pattern (one center, four around it). Connect the outer dots with curved petals — scoop your line outward between each pair of dots like a flower petal. Fill the petals with pink or red powder, drop a yellow circle in the center, and ring it with white dots. Surround the flower with a circle of green leaves (simple pointed ovals). This is the design Indian schoolchildren learn first, and it never looks childish when the colors are rich and the lines are clean.
3. Classic Peacock Feather (Intermediate, 1.5 hours)
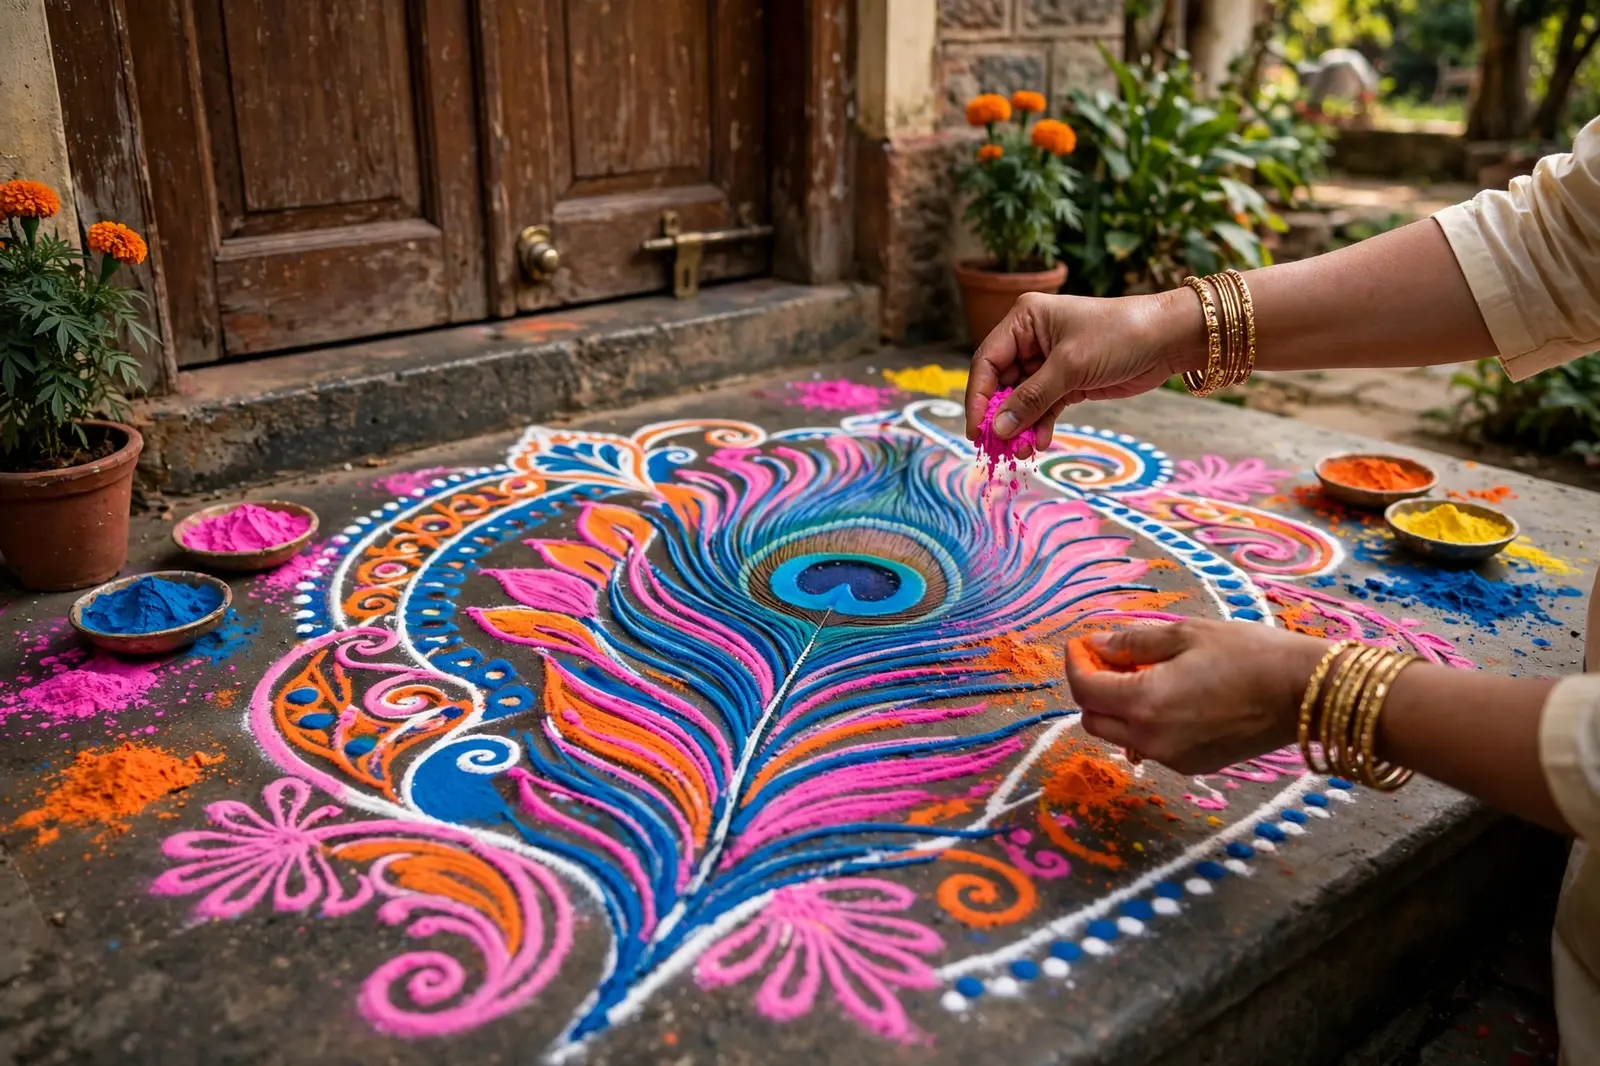
The peacock feather is Diwali’s most requested motif. Start with a long central stem line in green. At the top, draw the feather’s “eye”: three concentric teardrops in blue (outer), green (middle), and gold/yellow (inner), each outlined in white. Below the eye, draw fine barbs — short diagonal strokes on both sides of the stem, alternating blue and green. Fill the background around the feather with deep red or maroon powder so the feather glows against it. Pro tip: use a cone bottle for the eye’s fine outlines; freehand powder will blur the teardrop points.
4. Marigold Circle (Beginner, 40 minutes)
No powder skills needed — this is pure flower power. Draw a large circle outline in white powder. Fill the ring between two concentric circles with marigold heads packed tightly, alternating orange and yellow. Fill the center with red rose petals, and place a small brass diya (or LED diya) in the very middle. Ring the outside with white dots. It takes 40 minutes, smells wonderful, and guests will assume it took all morning.
5. Swastik Doorway Design (Beginner, 25 minutes)
The swastik is an ancient auspicious symbol in Hindu tradition, drawn at doorways to invite good fortune. Draw a bold swastik in the center with yellow powder, about two feet across. Outline it in white, then surround it with a square border of red dots. Fill the four corners outside the swastik with small diya motifs or flower shapes in orange and green. Add your family members’ footprints? No — keep it clean and symmetrical. Note: draw it in the traditional orientation with arms bent to the right, and always explain its meaning to curious guests unfamiliar with the symbol.

6. Geometric Star (Intermediate, 1 hour)
Mark a 7×7 dot grid. Starting from the center dot, draw straight lines to every second outer dot, forming an eight-pointed star. Connect the star’s points with a circle, then fill alternate star points in contrasting colors — red and yellow is classic, blue and white is striking. Outline the entire star in white and add dots at each point’s tip. The geometry does the artistic work for you; precision in the dot grid is everything.
7. Lotus Bloom (Intermediate, 1 hour)
Draw three concentric circles. In the center circle, draw eight lotus petals — each a pointed oval radiating from the middle, like orange segments. Fill the petals in graduated pink: deep pink at the base, light pink at the tips. In the middle ring, draw sixteen smaller petals in white. Fill the outer ring with green leaves between the petals. The lotus symbolizes purity and is especially appropriate for the Lakshmi Puja rangoli. A yellow center with white dots completes the bloom.
8. Paisley Trail (Intermediate, 1.5 hours)
Paisleys (mango motifs) make a gorgeous flowing design. Draw a large paisley — a teardrop with a curved, hooked tip — in the center, about 18 inches tall. Fill it with deep red, add a white outline, and decorate its interior with small white dots and a green leaf sprig. Then draw a trail of five smaller paisleys curving away from the big one, shrinking as they go, alternating red and orange. Connect them with a thin vine line dotted with tiny leaves. This design looks stunning trailing along a long verandah or hallway.
9. Thirteen-Dot Kolam Grid (Intermediate, 1.5 hours)
The classic Tamil kolam. Mark a 13×13 dot grid — 169 dots, which sounds intimidating but takes only 15 minutes with practice. Using white powder, draw one continuous looping line that weaves around every dot without lifting your hand: curve around each dot, loop to the next, and let the pattern emerge. This meditative technique is the heart of kolam tradition. Once the white skeleton is done, fill alternate enclosed spaces with colored powder — traditionally just one or two colors for elegance. Mistakes? In kolam, an imperfect loop is still beautiful; the flow matters more than precision.
10. Full Peacock (Advanced, 3 hours)
The showstopper. Sketch the peacock’s body first: an elegant S-curve for the neck, a rounded body, and a fanned tail spreading across two feet. Fill the body in royal blue, the neck in teal-green, and draw the crest (three small lines with dot tips) on the head in gold. The tail is the masterpiece: 12–15 feather eyes, each a concentric teardrop in blue, green, and gold, arranged in a fan and outlined in white. Fill the background between feathers with deep maroon so the tail blazes. Place diyas around the tail’s arc. Start this one early on Diwali morning — it rewards patience like nothing else in this guide.
11. Floral Toran Border (Beginner, 45 minutes)
Instead of one central design, decorate the border of your doorway or the edge of your verandah. Draw a straight white line as your base, then repeat a simple unit along it: a marigold-head circle (orange), a green leaf pair, a white dot trio — repeat for the full length. This “toran border” frames any entrance beautifully and takes under an hour even for long verandahs. Combine it with a small central rangoli (like design #2) for a complete look.
12. Diya-and-Petal Fusion (Beginner, 35 minutes)
Draw a large circle in white powder. Inside, arrange real marigold heads and rose petals in concentric color rings — orange, yellow, red — pressing them gently into the floor. In the center, place five real clay diyas in a flower pattern (four around one). Outline the outer circle with white powder dots. At dusk, light the diyas: petals plus real flames is the most magical 35-minute rangoli in this entire guide. Refresh wilted petals each morning through the festival.

13. Mandala Circle (Advanced, 2.5 hours)
Draw five concentric circles. Working from the outside in, fill each ring with a different repeating motif: outer ring — alternating triangles in red and white; next — small dots in yellow; next — petal shapes in blue; next — a zigzag in green; center — a lotus (see design #7) in pink and gold. The key to mandalas is symmetry: divide each circle into equal segments with light chalk lines first (12 segments is standard), then fill each segment identically. Use cone bottles for the fine work. The result looks impossibly intricate, but it is just repetition done carefully.
14. Corner Triangle Motif (Beginner, 30 minutes)
Perfect for apartment doorways with limited floor space. In the corner where your door meets the wall, draw a large triangle with white powder. Fill it with a gradient: red at the base, orange in the middle, yellow at the apex. Add white dots along all three edges and a small diya motif (design #1’s teardrop) at the center. Two of these flanking a doorway — one on each side — look deliberate and designer-made. Total floor space needed: two square feet.
15. Grand Entrance Medallion (Advanced, 3+ hours)
For the main entrance on Lakshmi Puja day itself. Combine everything: a 15×15 dot-grid kolam base (design #9’s technique) in white, filled with a full peacock-feather center (design #3), ringed by a lotus band (design #7), edged with a marigold-head flower border (design #4’s method), and surrounded by 21 lit diyas after dark. This is an all-morning project — start at 7 a.m., work with a helper on the dot grid, and finish by noon. Photograph it at dusk with the diyas lit; it will be the most-shared image of your Diwali. For the story behind the festival it celebrates, see our Diwali festival of lights guide.
Rangoli Designs at a Glance
| # | Design | Difficulty | Time | Best Spot |
|---|---|---|---|---|
| 1 | Simple Diya Corner | Beginner | 30 min | Doorway corner |
| 2 | Five-Dot Flower | Beginner | 20 min | Small threshold |
| 3 | Peacock Feather | Intermediate | 1.5 hrs | Main entrance |
| 4 | Marigold Circle | Beginner | 40 min | Foyer, puja room |
| 5 | Swastik Doorway | Beginner | 25 min | Main door |
| 6 | Geometric Star | Intermediate | 1 hr | Verandah center |
| 7 | Lotus Bloom | Intermediate | 1 hr | Puja room entrance |
| 8 | Paisley Trail | Intermediate | 1.5 hrs | Long hallway |
| 9 | 13-Dot Kolam | Intermediate | 1.5 hrs | Courtyard |
| 10 | Full Peacock | Advanced | 3 hrs | Main entrance |
| 11 | Floral Toran Border | Beginner | 45 min | Verandah edge |
| 12 | Diya-and-Petal Fusion | Beginner | 35 min | Entrance, dining |
| 13 | Mandala Circle | Advanced | 2.5 hrs | Living room, hall |
| 14 | Corner Triangle | Beginner | 30 min | Apartment doorway |
| 15 | Grand Medallion | Advanced | 3+ hrs | Main entrance, Puja day |
Common Rangoli Mistakes and How to Fix Them
Powder blowing away: work early morning when the air is still, and mist the floor lightly first. Colors looking muddy: you are mixing powders with your fingers — use separate pinches per color and wash hands between colors. Wobbly lines: you are drawing too slowly; confident, continuous strokes are straighter than careful hesitant ones. Design too small: beginners always draw too small — double the size you think you need; rangoli reads best at 3+ feet across. Smudged by foot traffic: rope off the area with a flower garland “fence” or place diyas as a natural barrier. Fading by evening: powder rangoli fades; refresh the white outlines an hour before guests arrive — five minutes of touch-up restores the whole design.
Powder vs Flower Rangoli: Which Should You Choose?
Both are beautiful; they solve different problems. Powder rangoli gives you precision — fine lines, intricate geometry, peacock feathers with real detail — and it lasts 2–3 days indoors. It needs a still morning (wind is the enemy), a damp floor, and about twice the time. It stains light marble if left for days, so lift it with a damp cloth after the festival. Flower rangoli is faster, fragrant, and foolproof — no drawing skill needed, just patience in placing petals. It photographs better than powder in almost every case, but it wilts within 24–36 hours and costs more in flowers. The hybrid — powder outlines filled with flower petals, or a powder design ringed with marigold heads — is what most experienced decorators actually do: the powder gives structure, the flowers give luxury. For Lakshmi Puja day itself, go hybrid; for the other four days, simple powder designs refreshed daily are the practical choice.
Rangoli Ideas for Apartments and Small Spaces
No courtyard? No problem. Apartment rangoli is about thinking small and vertical. Use design #14 (corner triangle) flanking your main door — it needs two square feet. Try a doorstep strip: a 6-inch-wide band of alternating marigold heads and white dots running the width of your doorway. Rangoli on a tray is the apartment hack everyone should know: build a full circular rangoli on a large brass thali or tray and place it in the foyer — zero floor space, zero staining, and you can move it when guests arrive. Wall-adjacent rangoli uses the wall as one border: a half-circle design against the skirting board looks complete while using half the floor. And rangoli stickers — pre-made adhesive designs — give you a perfect mandala on tile in five minutes; keep a set for the mornings you oversleep.
Rangoli Quick-Start Checklist for Diwali Morning
Sweep and dampen the floor. Lay out all powder colors in small bowls — you will work faster. Chalk-sketch the design lightly. Mark your dot grid first and double-check the spacing before drawing a single line. Draw the white skeleton completely before adding any color. Fill colors from the center outward, darkest colors first. Add white outlines last for crispness. Step back every 15 minutes and check symmetry from standing height — designs look different from above than from floor level. Photograph in morning light, then again at dusk with diyas lit around it. Keep a small bowl of each color aside for touch-ups before guests arrive. And finally: sign nothing, frame nothing — rangoli’s beauty is that it is temporary, made fresh each year with love.
Rangoli Color Symbolism: What Each Color Means
Rangoli colors are not random — each carries meaning, and choosing deliberately deepens the tradition. Red signifies love, passion, and the goddess’s energy; it dominates bridal and festive designs. Yellow (turmeric’s color) represents knowledge, learning, and happiness — the color of marigolds and prosperity. Green stands for nature, harvest, and new beginnings. Blue evokes the divine — Krishna’s color — and brings calm to busy designs. White is purity and peace; it outlines and sharpens every other color. Orange combines red’s energy with yellow’s joy — the quintessential Diwali color. Purple and pink are modern additions signifying celebration and affection. Traditionalists often limit themselves to three or four colors plus white for harmony; maximalists use the full spectrum for joy. Neither is wrong — but knowing the symbolism lets you design with intention, not just decoration. A Lakshmi Puja rangoli in red, yellow, and gold, for instance, is symbolically “wealth, knowledge, and prosperity” — a wish drawn in powder.
Preserving Your Rangoli Beyond Diwali
Rangoli is temporary by design — but the memory does not have to be. Photograph each year’s design from the same angle and start a family album; after a decade you will have a beautiful record of growing skill. Some families press a small portion of the design’s flower petals into a scrapbook with the date. If you created a design you love, redraw it on paper with colored pencils while it is fresh — that sketch becomes next year’s template, better than any stencil because it is yours. And share generously: a photo of your rangoli with a heartfelt line makes a Diwali greeting more personal than any store-bought card.
Watch: DIY Diya Decoration for Your Rangoli Display
Once your rangoli is done, surround it with beautiful handmade diyas. This video shows a creative DIY diya decoration project — perfect for placing around the edge of designs #4, #12, or #15 above:
Frequently Asked Questions About Diwali Rangoli
How long does a powder rangoli last?
A powder rangoli on a sheltered indoor or verandah floor lasts 2–3 days with light foot traffic; outdoors, wind and dew fade it within a day. Flower rangoli lasts 1–2 days before petals wilt. For all five days of Diwali, plan to refresh white outlines daily and replace flower elements each morning. A light mist of water (not a spray) helps powder settle and last longer.
What can I use instead of rangoli powder?
Rice flour (the traditional base), colored with turmeric (yellow), kumkum (red), and crushed flower petals, is the classic natural alternative. Colored sand works outdoors. For a modern shortcut, rangoli stickers and stencils give clean results in minutes. Flower petals alone — marigold, rose, jasmine — make a stunning chemical-free rangoli.
Is it okay to use rangoli stencils as a beginner?
Absolutely — stencils are training wheels, not cheating. They teach you spacing, symmetry, and color combinations. Many experienced rangoli artists still use stencils for large geometric borders and freehand only the center motif. Start with stencils for designs #6 or #13, then graduate to freehand dot grids.
How do I make rangoli colors at home?
Mix fine white rangoli powder or rice flour with natural colorants: turmeric for yellow, kumkum or red food color for red, indigo or blue food color for blue, spinach powder or green food color for green. Sieve the mixture twice for even color. Homemade colors are eco-friendly and safe around children and pets — a real advantage over some commercial powders.
What is the meaning of rangoli at Diwali?
Rangoli at the doorway welcomes Goddess Lakshmi, the goddess of wealth and prosperity, into the home — the tradition holds that she enters the most beautiful, well-lit homes first on Diwali night. The designs also feed small creatures (ants and birds eat the rice-flour base), making rangoli an act of generosity. Read more in our Diwali festival of lights guide.
Can I make rangoli on carpet or wooden floors?
Powder rangoli needs a hard, smooth surface — it will stain carpet and seep into unsealed wood. On carpet, lay a large cotton sheet or rangoli mat first and build your design on that. On wooden floors, use a plastic sheet underneath. Flower-petal rangoli is the safest choice for delicate floors, and it lifts away with zero residue.
The Bottom Line
Rangoli rewards the brave beginner: start with the five-dot flower or the diya corner, master the dot grid, and within one Diwali season you will be attempting the peacock. Remember the three rules — damp floor, chalk sketch first, white outlines last — and every design in this guide is within reach. Draw it in the morning, light the diyas around it at dusk, and watch your doorway become the brightest spot on the street. Share your creations with festive wishes from our Happy Diwali quotes collection, and have a luminous Diwali 2026.
Keep exploring: see how the festival fits into the wider calendar in our guide to New Year traditions in India.