Thanksgiving wreath DIY projects are the perfect entry point into holiday crafting: one satisfying afternoon, basic supplies, and a front-door statement that greets every guest for weeks. A handmade Thanksgiving wreath costs a fraction of a store-bought one, matches your exact style and palette, and carries the quiet pride of “I made that.” This guide walks you through everything — wreath bases, materials, fifteen distinct designs across four styles, full step-by-step tutorials, hanging methods, weatherproofing, and storage.
Every project below is written for beginners. You will need a wreath base, a glue gun or floral wire, and decorations — that is the entire toolkit for most designs. Time estimates are realistic (not craft-blog optimistic), and each tutorial flags the common mistakes before you make them.
Thanksgiving Wreath Basics: What You Need to Know
Choosing a Wreath Base
The base determines the wreath’s look and how you attach things. Four options cover nearly every design:
Grapevine wreath: The rustic classic. Its twiggy texture grips decorations without glue, it looks good even half-decorated, and it is inexpensive ($5–$12). Best for: rustic, farmhouse, and natural designs. Attach items by tucking stems into the vines or wiring them on.
Wire wreath frame: The minimalist skeleton — just metal rings. Best for: lush designs where you build the full body from greenery (eucalyptus, boxwood), since every inch gets covered. Attach with floral wire or a glue gun. Frames cost $3–$6.
Foam wreath form: A solid ring you wrap or pin into. Best for: fabric-wrapped wreaths, deco-mesh designs, or anything needing pinned attachments. Wrap first in ribbon or burlap so no foam shows.
Straw wreath: The florist’s workhorse — dense, pinnable, and natural-looking. Best for: dried-flower and herb wreaths. Soak it briefly and let it dry before working to reduce shedding.
Essential Tools and Supplies
- Glue gun + extra glue sticks (the single most-used wreath tool)
- Floral wire (22-gauge) and wire cutters
- Scissors for ribbon and stems
- Ribbon in your palette (2.5-inch wired ribbon is easiest to shape)
- A hanger: over-door hook, suction hook, or ribbon loop
The Golden Rules of Wreath Design
Work in thirds or odd clusters. Divide the wreath mentally into sections and decorate asymmetrically — a lush cluster at the bottom-left with a bow at the top, for example — rather than spacing items evenly all around. Even spacing reads as manufactured; clustered asymmetry reads as designed.
Layer back to front. Greenery first (the base layer), then large elements (pumpkins, large leaves), then medium fillers (berries, pinecones), then small details and ribbon last. Each layer should partially cover the last.
Step back constantly. Hang the wreath on a door or hook every few minutes and view it from 6–10 feet away — that is how guests will see it. Details invisible at distance are wasted effort; gaps invisible up close scream from the sidewalk.
Rustic Thanksgiving Wreath DIY Ideas
1. Classic Grapevine Harvest Wreath
The quintessential Thanksgiving wreath. Materials: 18-inch grapevine wreath, faux fall leaf sprigs, 3–5 mini pumpkins, berry sprigs, pinecones, burlap bow. Time: 45 minutes. Tuck leaf sprigs into the grapevine all around, working in one direction. Wire mini pumpkins in a cluster at the lower-left. Tuck berry sprigs and pinecones into gaps. Tie a burlap bow and wire it at the top. The grapevine’s texture does half the design work — this wreath looks full with surprisingly few additions.
2. Wheat and Burlap Wreath
Wrap a straw wreath in wide burlap ribbon (pin or glue as you go), then hot-glue bundles of dried wheat radiating outward all around, like sun rays. Add a small chalkboard “give thanks” sign wired to the center-bottom. Dried wheat is cheap, golden, and unmistakably harvest. Total cost: under $15.
3. Pinecone Forest Wreath
Cover a straw or foam wreath entirely in pinecones — large ones first, then medium, then small ones glued into every gap. Add a few faux berry sprigs for color. Collect pinecones free and bake at 200°F (95°C) for 30 minutes to open scales and kill insects. This wreath is nearly indestructible outdoors and transitions to winter with the addition of a red bow.
4. Dried Orange Slice Wreath
Thread dried orange slices, cinnamon sticks, and star anise onto a grapevine base with floral wire, clustering them in the lower third. Dry orange slices yourself: 200°F (95°C) for 2–3 hours, flipping halfway. The scent is incredible — guests will smell this wreath before they see it. Keep it under a porch roof; rain softens dried fruit.
Modern Thanksgiving Wreath DIY Ideas
5. Monochrome Eucalyptus Wreath
Cover a wire frame entirely in eucalyptus — real or faux — wiring small bundles all around in the same direction until no wire shows. That is the whole wreath: one material, perfect execution. Add a single black or brass bow if you must, but restraint is the design. Eucalyptus dries beautifully, so a fresh version lasts the whole season.
6. White Pumpkin Minimalist Wreath
On a grapevine base, cluster 5–7 small white pumpkins (real or faux) in the lower-left third, add a few sprigs of dusty miller or white berries, and finish with a cream velvet bow. The white-on-twig contrast is striking and modern. Spray-paint orange minis white with matte paint if white pumpkins are scarce.
7. Hoop Wreath with Fall Foliage
The modern hoop wreath: a 14-inch metal or wood hoop, decorated only on the lower third with fall foliage, a mini pumpkin or two, and trailing ribbon. The bare upper hoop is the design statement — negative space as decor. Hang with a long ribbon from a nail or hook. Lightweight, cheap ($10–$15), and very now.
8. Black and Gold Glam Wreath
Spray-paint a grapevine wreath matte black, then add gold-painted mini pumpkins, gold berry sprigs, and a black-and-gold bow. Moody, dramatic, and unforgettable on a dark door. The black base makes gold elements glow. This wreath photographs spectacularly at dusk with porch lighting.
Farmhouse Thanksgiving Wreath DIY Ideas
9. Cotton and Burlap Farmhouse Wreath
On a grapevine base, arrange cotton stems in clusters, add burlap ruffles (gathered burlap ribbon pinned around the inner edge), mini white pumpkins, and a gingham bow. The cream-and-burlap palette is pure farmhouse. Cotton stems are reusable for years — store the wreath intact and it is ready next November.
10. Buffalo Check Bow Wreath
Let the bow be the star: a large buffalo-check bow (black-and-white or red-and-black) wired to the top of a simple greenery-and-pinecone wreath. The pattern does the seasonal talking; the wreath underneath can be simple. Buffalo check reads as fall even without a single pumpkin.
11. “Give Thanks” Tobacco Basket Wreath
Use a flat tobacco basket (or any shallow round basket) as the base instead of a ring. Fill with fall foliage, mini pumpkins, and cotton, and add a small “give thanks” sign. The basket format is distinctly farmhouse and hangs flat against the door — ideal for storm doors with limited clearance.
12. Corn Husk Wreath
Glue dried corn husks (from craft stores, or saved from fresh corn) in overlapping layers around a straw wreath, like shingles. Add a burlap bow and a few dried red peppers or mini Indian corn. The texture is incredible — ruffled, golden, and completely unique. Mistakes are invisible in the layering, making this very beginner-friendly.
Kid-Friendly Thanksgiving Wreath DIY Ideas
13. Handprint Leaf Wreath
Trace kids’ hands on fall-colored construction paper, cut out dozens of “leaves,” and glue them overlapping around a paper-plate ring (center cut out). Write something each child is thankful for on a few leaves. It is charming, personal, and costs almost nothing. Laminate or cover with clear contact paper if hanging outdoors.
14. Painted Pumpkin Mini Wreath
Let kids paint mini pumpkins with acrylics, then wire the finished pumpkins onto a small grapevine wreath with ribbon. Their art becomes the front-door display — the pride factor is enormous. An adult handles the wiring; kids handle all the creative decisions.
15. Felt Leaf Wreath
Cut leaf shapes from craft felt (older kids can cut, younger ones can arrange), and glue them onto a foam wreath wrapped in burlap. Felt is forgiving, safe (no sharp edges), and weather-resistant enough for a covered porch. Add felt acorns (brown circles with caps) for extra charm.
Full Tutorial: The 60-Minute Harvest Wreath (Design #1, Expanded)
Materials Checklist
- 18-inch grapevine wreath
- 3 fall leaf garlands or 12–15 individual leaf sprigs
- 5 mini pumpkins (mixed colors)
- 4 berry sprigs
- 6 pinecones
- 1 roll 2.5-inch wired burlap ribbon
- Floral wire, glue gun, scissors
Step-by-Step
Step 1: Prep the base (5 min). Fluff the grapevine, pulling loose twigs outward. Decide which side is the top — mark it with a twist tie on the back.
Step 2: Add greenery (15 min). Cut leaf garlands into 8-inch sections. Tuck each section into the grapevine, all pointing the same clockwise direction, overlapping like shingles. Cover the full circle — this is your base layer and should hide most of the vine.
Step 3: Place pumpkins (10 min). Wire mini pumpkins in a cluster at the lower-left (the 7-to-8-o’clock position): one medium pumpkin as the anchor, four minis around it. Push wires deep into the grapevine and twist tight on the back.
Step 4: Fill with berries and pinecones (10 min). Tuck berry sprigs into gaps around the pumpkins and at the top-right for balance. Glue pinecones into remaining holes — vary their angles for a natural look.
Step 5: Make and attach the bow (10 min). Make a simple loop bow with the burlap ribbon (two loops each side, long tails). Wire it to the top of the wreath. Trim tails in a dovetail (V-cut).
Step 6: Hang and review (10 min). Hang the wreath and step back 10 feet. Fill any visible gaps, check that the bow is centered, and confirm nothing droops. Done.
Total cost: $20–$35. Total time: 60 minutes. Skill level: absolute beginner.
Hanging Your Wreath: Methods That Work
Over-door wreath hangers: The easiest — a flat metal hook that slides over the door. Get one sized to your door’s thickness; too loose and it rattles, too tight and it scratches. Pad the contact points with felt.
Suction cup hooks: For glass storm doors. Clean the glass with alcohol first, moisten the cup, and press firmly. Rated for the wreath’s weight plus a margin — a 20-inch decorated wreath can weigh 5+ pounds.
Ribbon hanging: Loop wide ribbon through the wreath, over the door top, and secure inside with a thumbtack or hook. Elegant and adjustable — lengthen the ribbon to hang the wreath lower.
Adhesive hooks: Removable outdoor-rated hooks hold most wreaths and remove cleanly. Follow the weight rating and the cure time (usually one hour before hanging).
Hang the wreath at eye level — the center of the wreath roughly 57–60 inches from the ground, the gallery standard. Too high is the most common hanging mistake.
Weatherproofing and Care
A covered porch is a wreath’s best friend — most wreaths last the full season there. On exposed doors, choose weatherproof materials: faux over fresh, grapevine over foam, sealed wood over paper. Real-leaf wreaths fade in direct sun within two weeks; spray them with a clear UV-protectant sealer to double their life. After rain, shake the wreath gently and let it air-dry — do not bring a soaked wreath indoors to a heated room, or the rapid drying can warp it.
Wind protection: wreaths on exposed doors should be secured at two points (hanger plus a small adhesive hook at the bottom, or wire through to the door knocker). A wreath becomes a sail in high wind — one gust can send it down the street.
Budget Breakdown
| Wreath Style | DIY Cost | Store-Bought Equivalent | You Save |
|---|---|---|---|
| Grapevine harvest | $20–$35 | $60–$90 | $40–$55 |
| Eucalyptus modern | $15–$25 | $50–$75 | $35–$50 |
| Pinecone rustic | $8–$15 | $45–$65 | $35–$50 |
| Kid handprint | $3–$8 | N/A (priceless) | — |
DIY wreaths save 50–70% over store-bought, and the base and many decorations reuse for years — the second year’s cost is often under $10 in fresh accents. For whole-house budget decorating, see our budget Thanksgiving decorations guide.
Storage: Keeping Wreaths Year to Year
Never stack wreaths flat under heavy items — they crush. Store each wreath in a wreath storage box, a large trash bag hung on a closet hook, or hung on nails on a basement or garage wall. Stuff the center with tissue paper to hold the shape. Silica gel packets prevent mustiness. Label each bag with the year and contents. A well-stored faux wreath lasts 5–10 years; grapevine bases last indefinitely and can be stripped and redecorated annually.
Troubleshooting: Fixing Common Wreath Problems
“My wreath looks flat and sparse”
You need more material — most beginner wreaths are under-stuffed by half. Add another full round of greenery, pushing sprigs in at angles rather than flat. Fluff every stem outward. The fix is almost always “add more,” not “rearrange.”
“Things keep falling off”
Glue alone fails on heavy items. Wire heavy pieces (pumpkins, large pinecones) through to the back of the base and twist tight — glue is for lightweight fillers only. For grapevine bases, tuck stems deep into the vines rather than gluing to the surface.
“The bow looks sad”
Use wired ribbon — it holds loops in shape. Make loops fuller than you think (skimpy loops are the classic bow failure), fluff each loop after tying, and cut tails long with dovetail ends. A great bow needs roughly 2 yards of 2.5-inch ribbon.
“One side looks heavier than the other”
Step back 10 feet and squint — the blur reveals the weight distribution. Move one medium element from the heavy side to the light side. Asymmetry is fine; imbalance is not.
“The colors clash”
Limit the palette to three colors plus green/brown neutrals. Remove the one item that does not fit the palette — there is always one rebel. Photograph the wreath; the camera reveals clashes the eye forgives in person.
Level Up: Advanced Wreath Techniques
The Double Wreath
Wire a smaller wreath (12-inch) inside a larger one (20-inch) for dimensional depth — decorate the outer ring with greenery and the inner ring with feature elements. The layered effect looks professionally designed and photographs beautifully.
Asymmetric Crescent Design
Instead of decorating the full circle, cover only a crescent (roughly one-third of the wreath), leaving the rest as bare grapevine or hoop. The negative space is the design statement — modern, artistic, and surprisingly easy since you decorate less area.
Mixed-Base Wreath
Combine bases: a grapevine wreath with a eucalyptus garland wrapped through it, or a hoop with a small grapevine cluster wired at the base. Mixed textures add professional richness.
Illuminated Wreath
Weave battery fairy lights through the finished wreath, hiding the battery pack behind the bow. A lit wreath on the door at dusk is unforgettable — and the lights make even a simple wreath look luxurious. Use warm white, and put the pack on a timer.
In Pictures: Thanksgiving Wreath DIY
Nothing says 'welcome' like a handmade wreath — follow this side-curl deco mesh tutorial for a full, professional-looking Thanksgiving wreath.
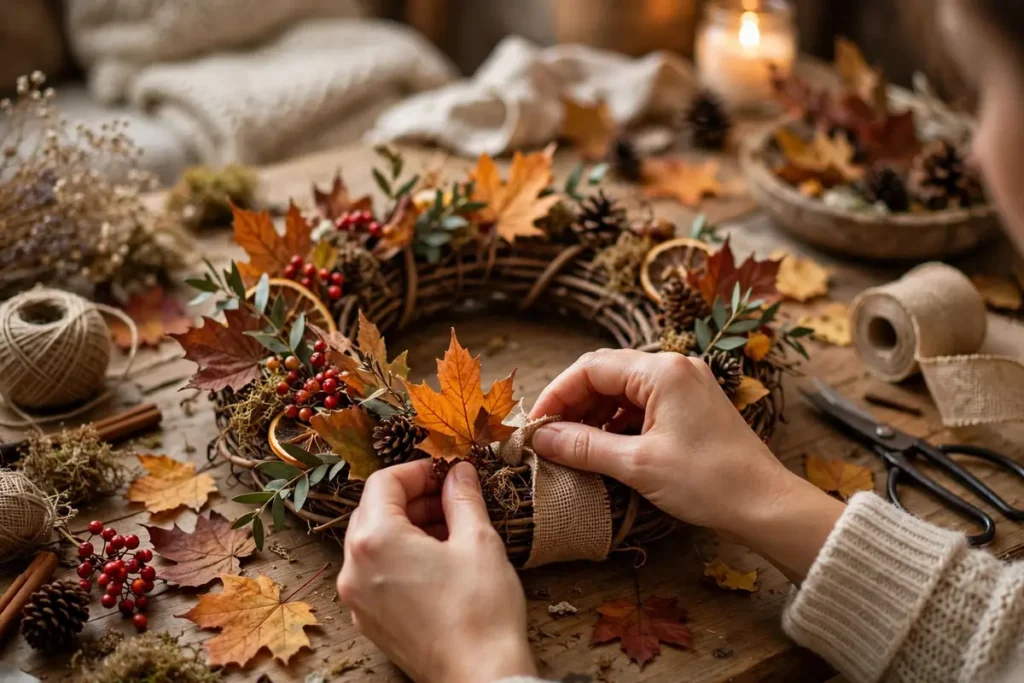
Hands crafting a fall wreath on a grapevine base with autumn leaves, berries, and ribbon.
Watch: Thanksgiving Wreath DIY
Dave's Wreaths builds a 'Simply Blessed' Thanksgiving wreath step by step — side-curl mesh method, ribbon layering, and sign attachment.
At a Glance: Thanksgiving Wreath DIY
Wreath methods and what each one needs.
| Method | Materials | Tip |
|---|---|---|
| Deco mesh side-curl | Wreath board, 10-inch deco mesh, wired ribbon, sign | The side-curl technique adds volume with fewer supplies |
| Grapevine + florals | Grapevine wreath, faux stems, hot glue | Work in thirds for even, balanced coverage |
| Fabric-strip wreath | Foam wreath form, fabric strips, ribbon | Swap the ribbon to reuse the wreath for every fall holiday |
| Feather reed grass | Wire form, ornamental grass bundles, floral wire | Free if you catch landscapers trimming in fall |
| Sign attachment | Wire signs through pre-drilled holes; hot-glue picks behind the sign for depth | |
| Hanging | A wide ribbon loop or over-door hanger protects the finish | |
Frequently Asked Questions
What size wreath should I get for my front door?
For a standard 36-inch door, a 22–26 inch wreath is the sweet spot — substantial without overwhelming. Small doors (30 inches) suit 18–20 inch wreaths; double doors can handle 28–32 inches or two matching 20-inch wreaths. When in doubt, go slightly larger — small wreaths look lost on big doors.
How long will a fresh Thanksgiving wreath last?
Fresh greenery wreaths last 2–4 weeks outdoors in cool fall weather — right on schedule for Thanksgiving if hung in early November. Mist every few days. Grapevine bases with faux decorations last the entire season and beyond.
Can I hang a wreath on a glass storm door?
Yes — use a suction-cup hook rated for the weight, or hang the wreath on the inner door and let it show through the glass (this also protects it from weather). Magnetic wreath hangers (two magnets, one each side of the glass) are another clean option for metal doors.
How do I keep my wreath from fading?
Keep it out of direct afternoon sun, spray with UV-protectant sealer, and choose fade-resistant materials (grapevine, pinecones, quality faux) for sunny exposures. Some fading is inevitable outdoors — plan the wreath’s “prime” for Thanksgiving week itself.
What is the easiest Thanksgiving wreath for a total beginner?
The grapevine harvest wreath (Tutorial above): tuck in leaf sprigs, wire on mini pumpkins, add a bow. No precise techniques, mistakes hide in the texture, and it looks abundant with minimal skill. Start there.
Can I use my Thanksgiving wreath for Christmas too?
Many designs transition beautifully: remove pumpkins and fall leaves, add evergreen sprigs, red berries, and a red or plaid bow. Pinecone, eucalyptus, and grapevine bases are especially adaptable. Plan for this when building — use wired (not glued) attachments for seasonal elements you will swap.
How do I store a wreath without crushing it?
Hang it — on a closet hook, a basement nail, or inside a wreath storage box hung on a wall. Never stack heavy items on top. Stuff the center with tissue paper to hold the shape, slip it into a large trash bag or wreath bag to keep dust off, and add a silica packet against mustiness. Hung storage keeps wreaths perfect for years.
Conclusion
A DIY Thanksgiving wreath is one of the highest-reward crafts in holiday decorating: an hour of pleasant work, $20–$35 in supplies, and a front door that welcomes every guest with warmth for weeks. Start with the grapevine harvest tutorial, hang it at eye level, and step back to admire your work. Then carry that handmade warmth inside — our fall front porch decor guide completes the entryway, and our Thanksgiving mantel decor guide brings the harvest feeling to the living room.